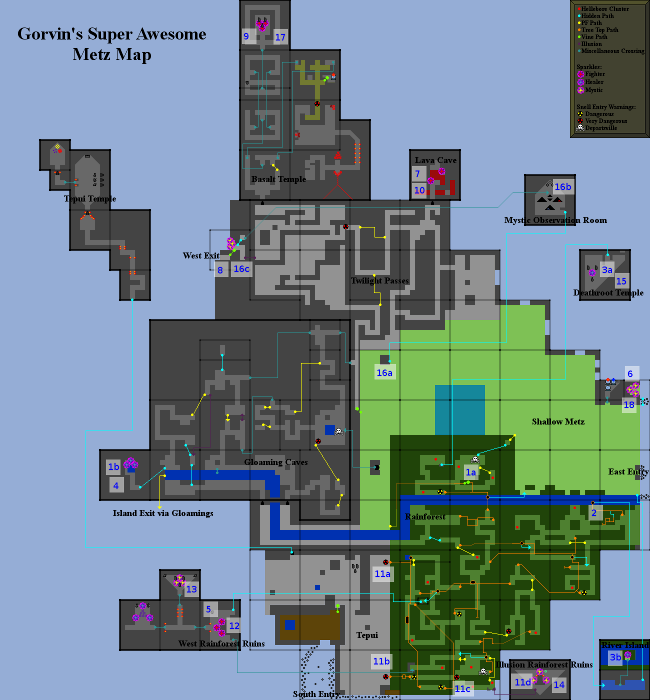
- 1a. Clear Deathroots.
1b. Proceed to Gloamings healer sub-temple and activate it. - 2. Go to the NE snell of the Rainforest and drop a healer off into the River Island healer sub-temple (use "/move run northwest" when dropping into the river). Healer activates the temple and waits here for now.
- 3a. Enter the Deathroot healer main temple and activate it.
3b. Have the healer that was dropped off fully charge the River Island healer sub-temple, exit, and rejoin through Deathroots. - 4. Return to the Gloamings healer sub-temple and fully charge it.
- 5. Activate the Rainforest fighter sub-temple.
- 6. Exit and activate East Cove mystic sub-temple.
- 7. Activate Lava Cave fighter sub-temple.
- 8. Activate Twilight mystic sub-temple.
- 9. Activate Basalt fighter main temple.
- 10. Return to the Lava Cave fighter sub-temple and fully charge it.
- 11a. Enter the Tepui (Yes, go all the way to the other side of the fucking island).
11b. Re-enter the Rainforest from the SE exit of the Tepui.
11c. Carefully lure the snell containing the Rainforest mystic sub-temple (charging head-first will get you killed).
11d. Activate the Rainforest mystic sub-temple. - 12. Return to the Rainforest fighter sub-temple and fully charge it.
- 13. Activate and fully charge the mystic main temple, just to the west.
- 14. Return to the Rainforest mystic sub-temple and fully charge it.
- 15. Return to the Deathroot healer main temple and fully charge it.
- 16a. Give the mystic a vine and drop him/her off into the mystic observation room.
16b. Mystic takes the hidden path from the observation room to the Twilight mystic sub-temple, places the vine on the rocks next to the shore, and fully charges the sub-temple.
16c. The rest of the group exits the island and re-enters it from the NW. - 17. Return to the Basalt fighter main temple and fully charge it.
- 18. Exit and fully charge the East Cove mystic sub-temple.